重要注意事项:
- 手动内部迁移必须由您自己完成。
- 这是一个手动过程,需要文件管理和数据库操作的技术知识
- 在开始迁移前备份您的网站,以防数据丢失
- 规划停机时间——您的网站在传输过程中可能暂时无法访问
- 此过程适用于在以下情况间移动网站:
- 同一 Hostinger 账户下的不同主机方案之间
- 不同 Hostinger 账户下的不同主机方案之间
- 您需要访问源(旧)和目的(新)主机方案
- 如果您拥有 WordPress 网站,可以查看 如何在 Hostinger 自动迁移内部网站?
❗ 重要提示 ❗
- 此流程不适用于使用 Hostinger 网站构建器创建的网站:尚不支持在 Hostinger 账户之间移动基于构建器的网站。
- 以下步骤适用于基于 WordPress 的网站
- 对于其他内容管理系统,流程可能略有不同。
- 但是,您仍然需要为所有类型的 CMS 下载并上传文件(以及数据库,如适用)。
- 如果您要迁移域名或电子邮件,请参考以下文章:
- 如何将域名转移到 Hostinger
- 如何在 Hostinger 账户之间移动域名
- 如何将电子邮件服务迁移到 Hostinger Email
选项 1 – 使用插件
此流程推荐用于总大小小于 512MB(包括文件和数据库)的网站:
- 安装 All-in-One WP Migration 插件,生成并下载 .wpress 文件。
- 删除原始网站。
- 在您偏好的主机方案上添加网站。
- 在新的主机方案上安装 WordPress。
- 使用 All-in-One WP Migration 插件恢复 .wpress 文件。
如果您的网站大于 512MB,您有以下替代方案:
- 手动创建并恢复备份,如下方 选项 2 所示。
- 购买 All-in-One WP Migration 插件许可证——这将移除上传大小限制。
选项 2 – 手动创建并恢复备份
此流程推荐用于大于 512MB 的网站,或者如果您希望自己执行备份和恢复。
在生成备份之前,检查并记下正确的数据库名称。如果不确定是哪个数据库,请查看您的 网站配置文件 并查找 数据库名称。
第 1 步 – 生成并下载您的网站备份
在移动网站之前,创建所有文件和数据库的完整备份。
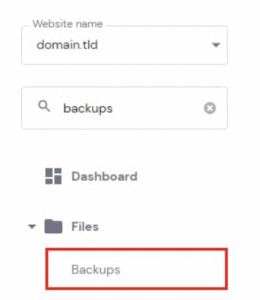
- 在 hPanel 中,转到 网站,点击相关网站旁边的 仪表盘。然后在左侧搜索 备份 并点击它
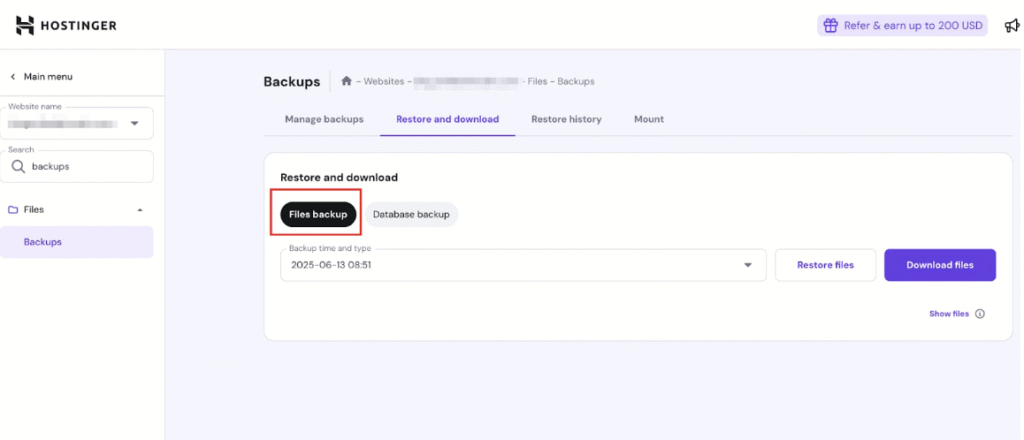
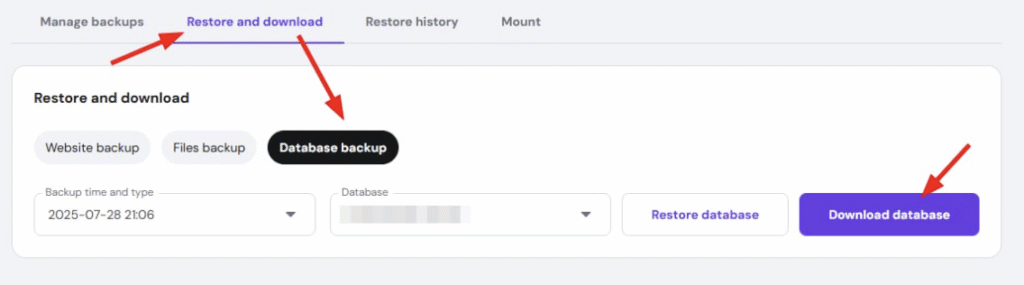
- 要下载文件,请转到 恢复和下载,并选择 文件备份:
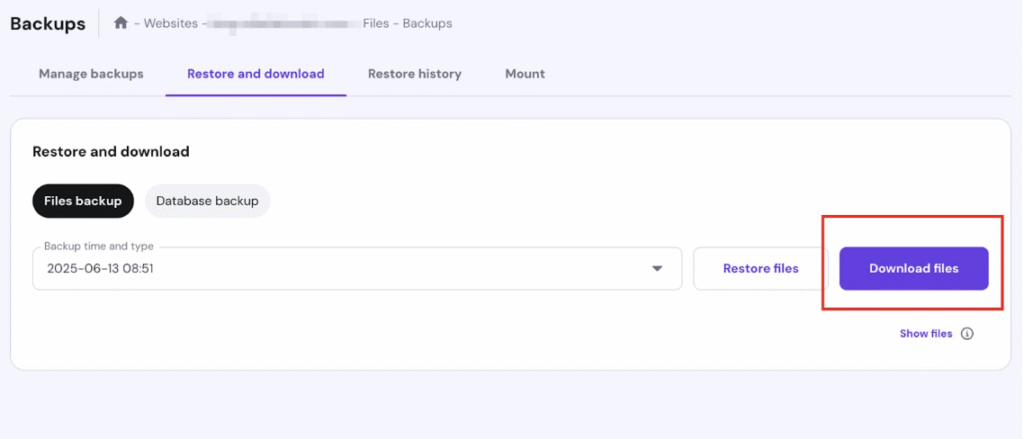
- 下拉菜单中将显示按日期分类的所有可用备份完整列表。从这些选项中选择偏好的备份日期,然后点击 下载文件:
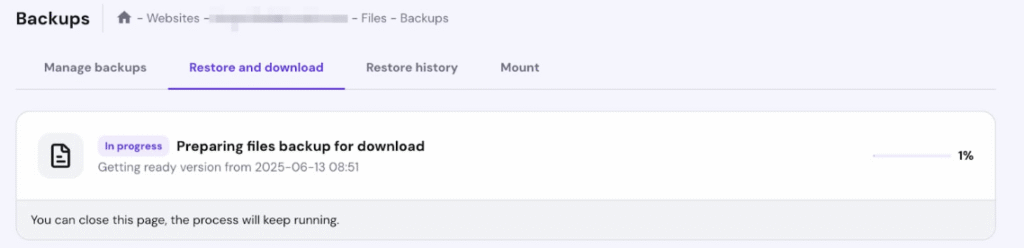
- 点击 下载文件 后,您将收到备份准备已开始的提示。时间取决于备份大小。您可以在 恢复和下载 标签中监控进度。
- 准备就绪后,将备份下载到您的计算机
下载生成的数据库过程类似——选择 数据库备份。选择您网站的数据库和备份日期,然后点击 下载数据库:
确保所选数据库与您的 网站配置 相匹配。
如果从 过期方案 生成网站备份,请联系 客户成功团队。
第 2 步 – 删除原始网站
下一步是从您的主机方案中移除原始网站。有必要这样做;否则,您将无法在另一个主机方案中使用您的域名。
如果您使用电子邮件服务,请务必在删除网站之前 备份您的电子邮件:
- 如何使用 Hostinger Webmail 导出电子邮件
-
如何获取您的电子邮件备份
-
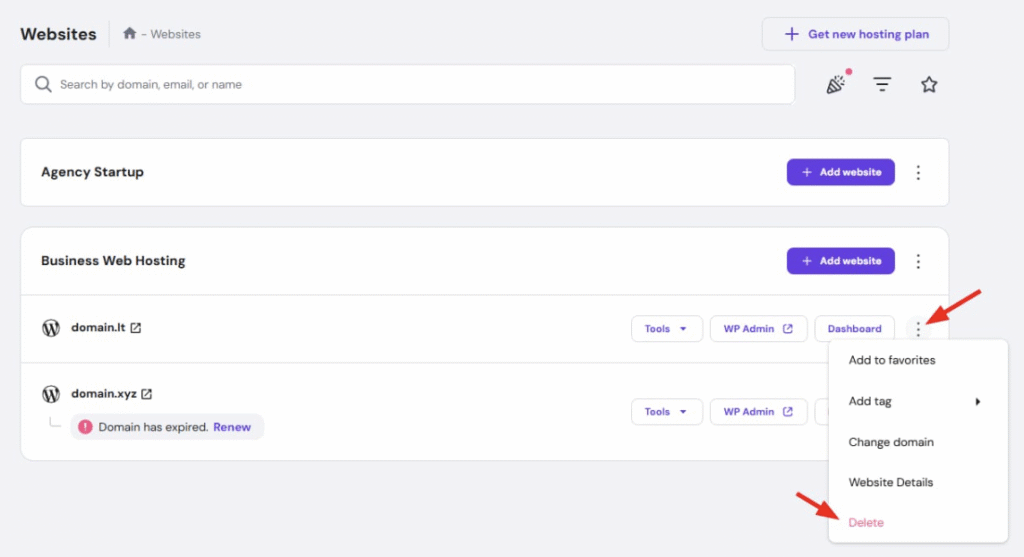
在 hPanel 中,转到 网站,找到相关网站,点击 省略号 ⋯ 按钮,然后选择 删除:
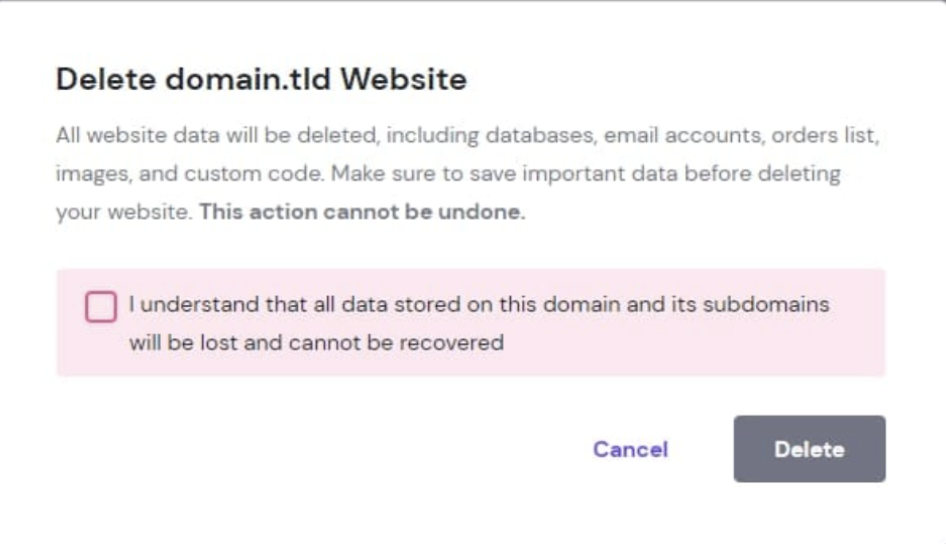
- 您将看到一条警告,提醒您将具体删除哪些内容。最后,通过打勾并点击 删除 来确认操作。
注意
- 如果您移除主机方案的 主域名,新的域名将自动被设为主域名。
- 网站完全删除可能需要 10–15 分钟。
第 3 步 – 将网站添加到新的主机方案/主机账户
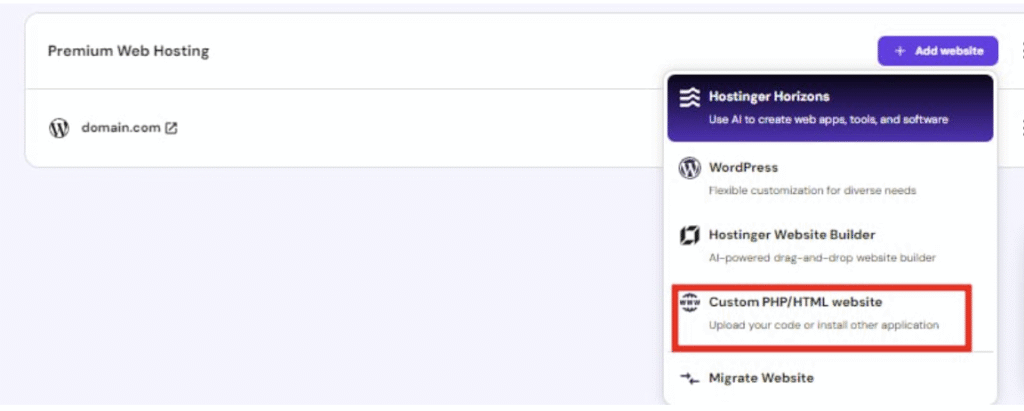
- 在 hPanel 中,转到 网站,找到偏好的主机方案,点击 添加网站,然后选择 自定义 PHP/HTML 网站 作为偏好平台
- 插入所需详细信息。最后,指定偏好的域名 并点击 继续。
如果您要使用位于另一个 Hostinger 账户中的域名,可能会要求您验证域名所有权——请按照 这些步骤 操作。
第 4 步 – 上传您的网站备份
有 多种上传备份的方式,但最简单的是使用 文件管理器。上传限制为 100 GB。
上传网站文件
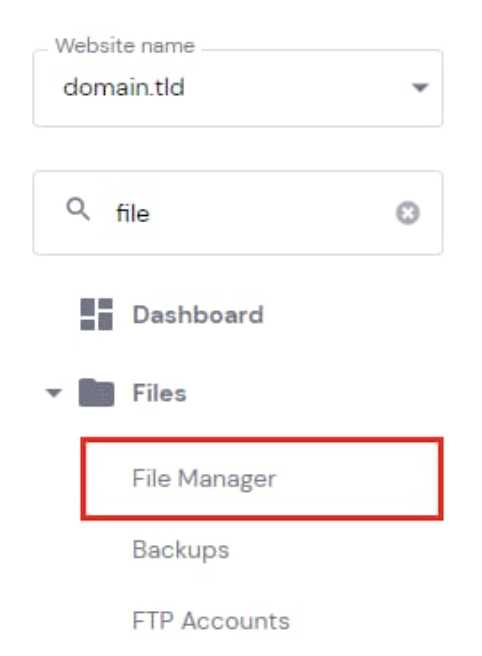
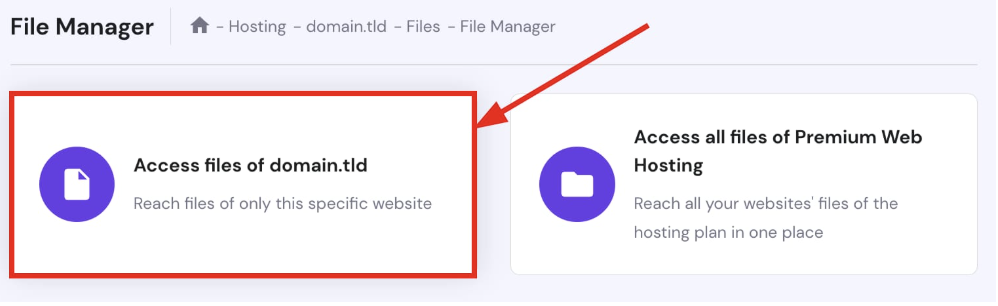
- 转到 网站 → 仪表盘 → 文件管理器:
- 打开您网站的 public_html 文件夹,然后点击右上角的 上传:
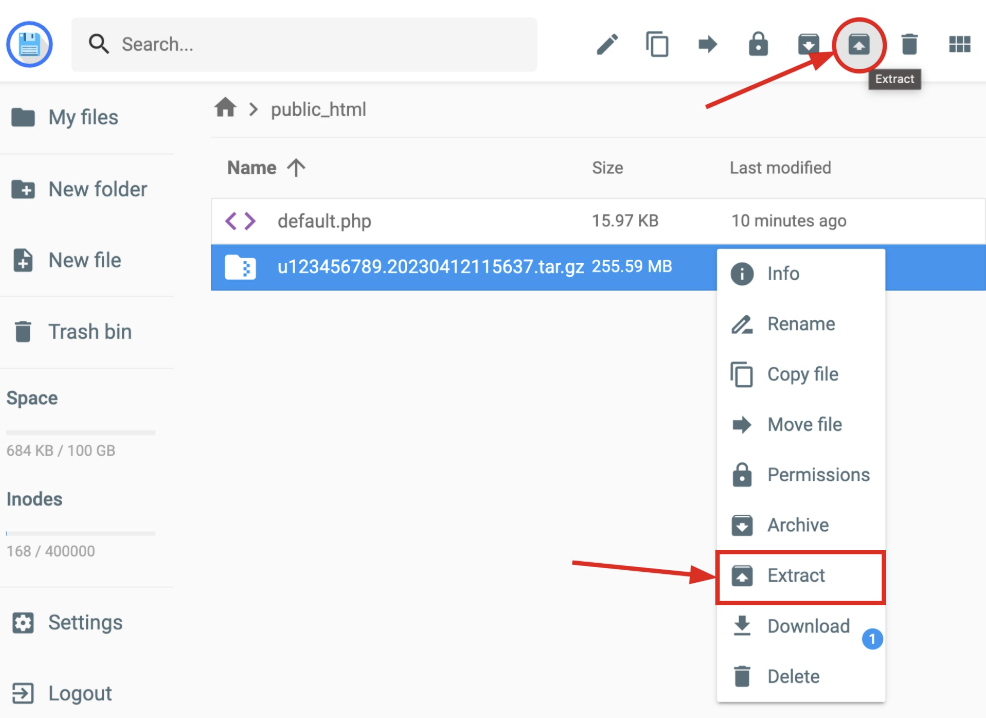
- 选择 文件 并上传您的 网站文件 备份(.tar.gz)。上传完成后,右键点击文件名并选择 解压。
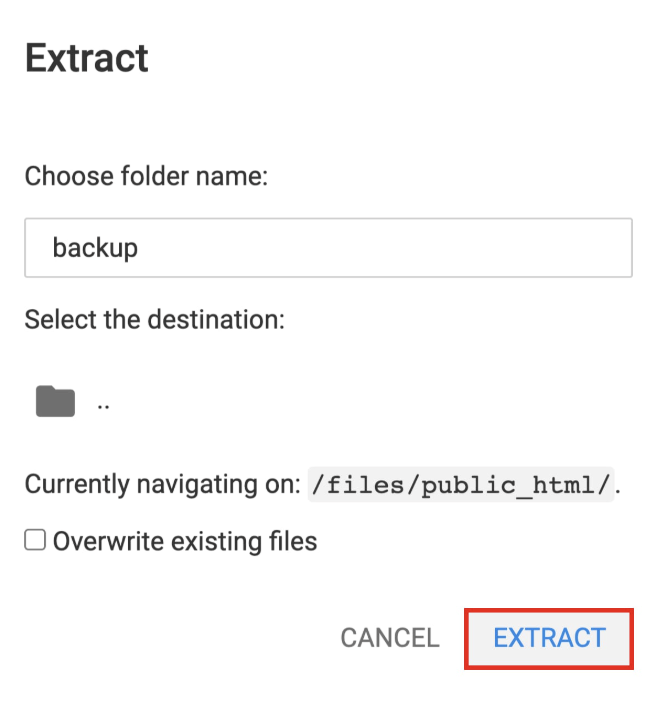
- 输入文件夹名称,例如 backup,然后点击 解压:
网站文件解压到专用文件夹后,您可以删除备份 .tar.gz 文件。
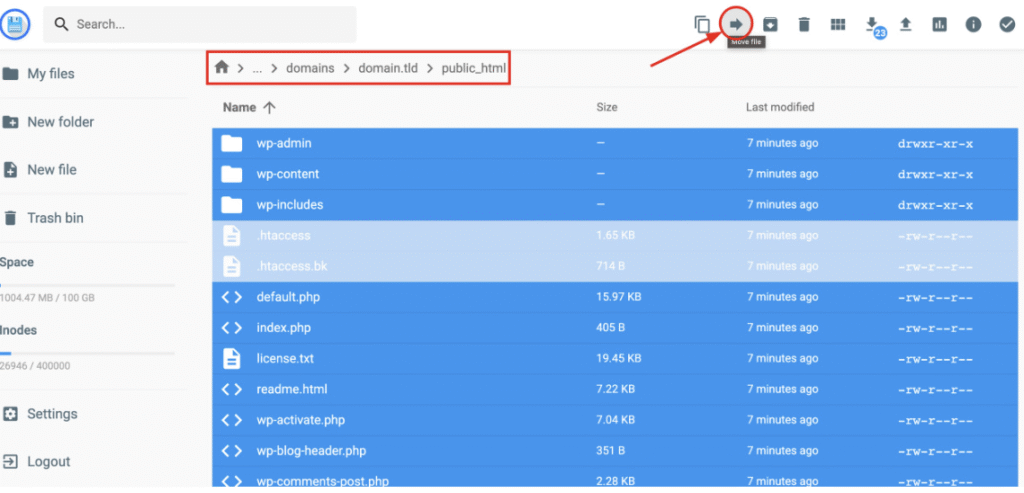
- 打开包含解压后网站文件的文件夹 → domains → 选择相关域名 → 打开其 public_html 文件夹,选择所有文件,然后点击右上角的 移动文件:
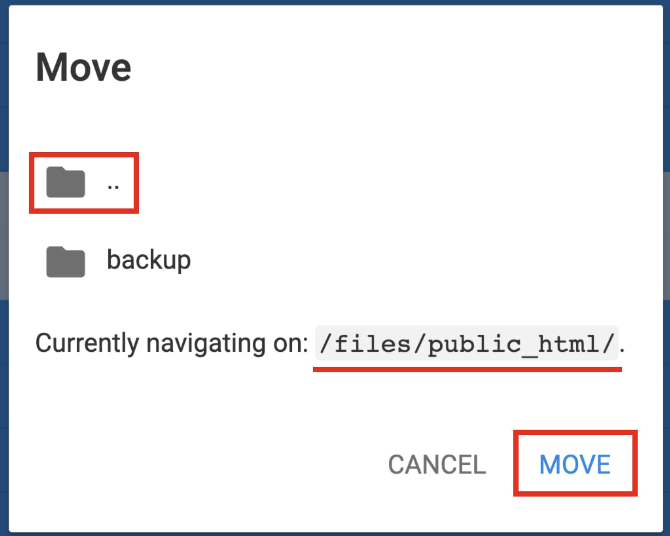
- 双击 .. 返回父目录,使目标为 /public_html,然后点击 移动:
目标是让所有网站文件都位于 public_html 文件夹中。
创建新数据库

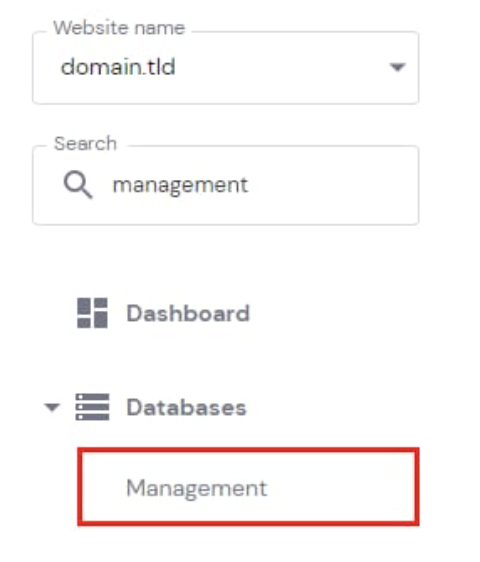

- 在上传数据库之前,您需要创建一个新数据库以导入数据库备份。转到 网站 → 仪表盘 → 侧边栏中的 数据库 → 管理:
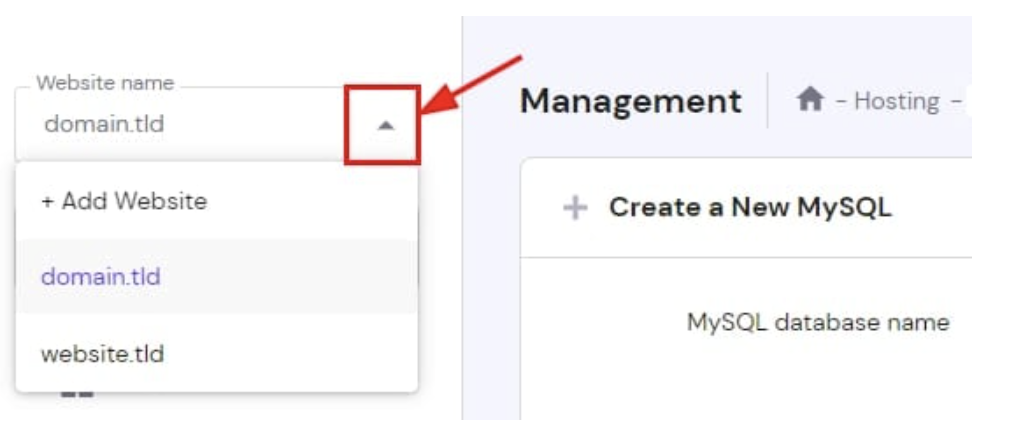
- 确保在左侧下拉菜单中选择了正确的网站:
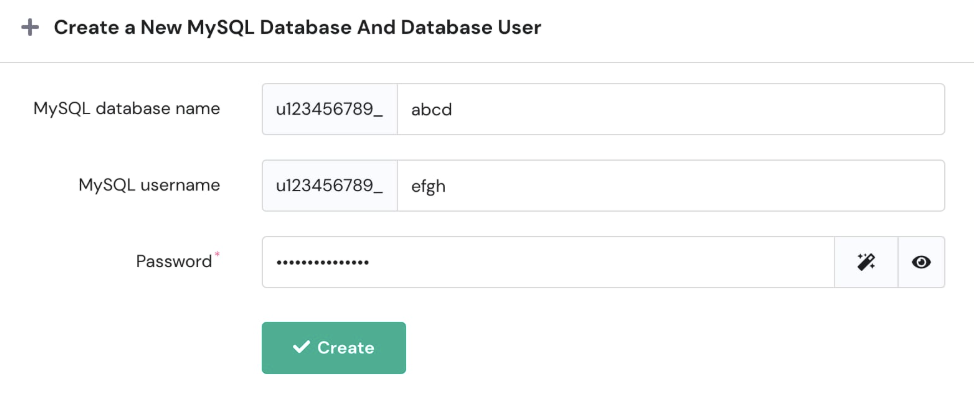
- 在 创建新的 MySQL 数据库和数据库用户 部分,输入数据库的名称、用户名和密码。
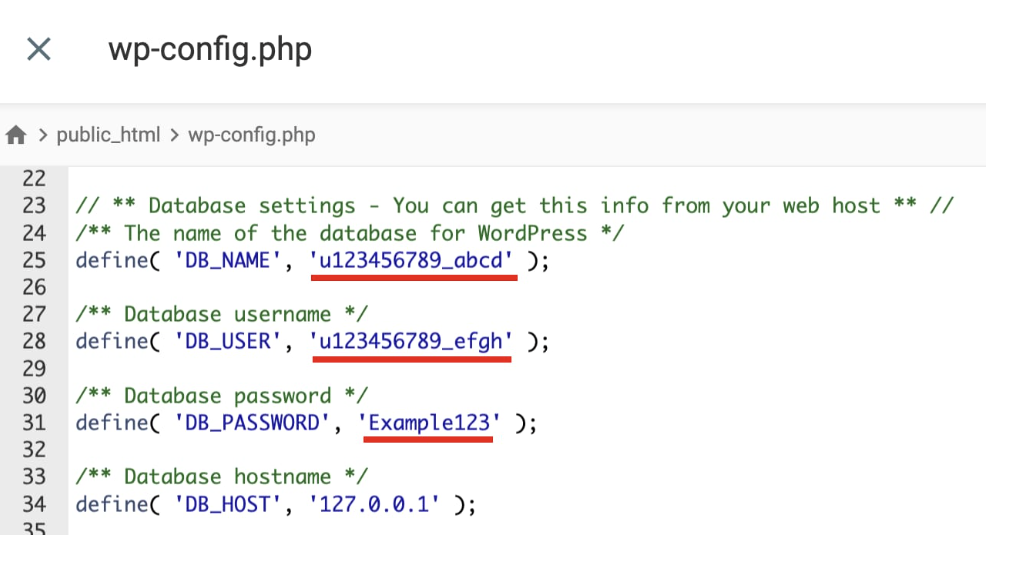
建议使用与原始数据库相同的名称和密码。您可以通过在文件管理器中打开 网站配置文件 来查找并复制这些详细信息。
对于 WordPress 网站,它在 public_html → wp-config.php 文件中:
- DB_NAME = MySQL 数据库名称
- DB_USER = MySQL 用户名
-
DB_PASSWORD = 您的偏好密码
-
填写详细信息后,点击 创建:
数据库名称和用户名的第一部分(u123456789)是唯一的,不能 删除或更改。
导入数据库备份
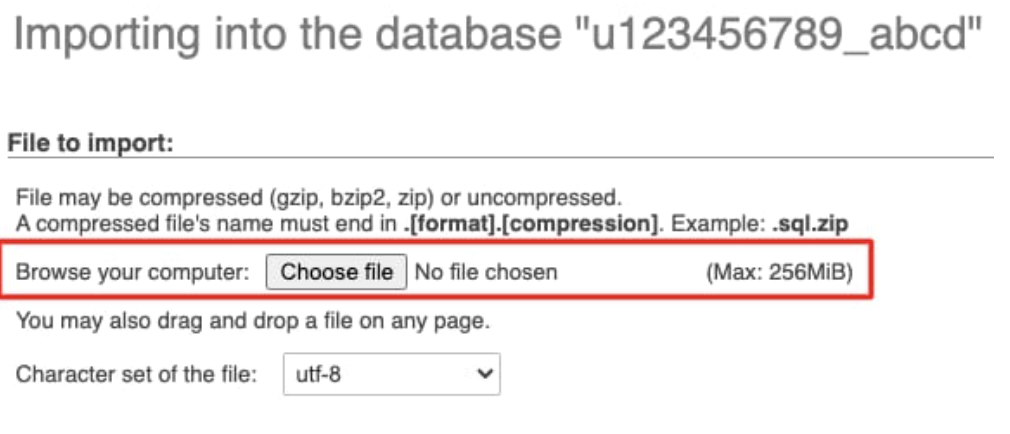
- 点击新创建数据库旁边的 进入 phpMyAdmin。在 phpMyAdmin 中,您的数据库默认已被选中,因此点击 导入:
- 选择您之前下载的数据库备份(.sql.gz):
- 不改变任何设置并继续,点击 执行 或 导入。
如果您在导入 .sql.gz 文件时遇到问题,将其解压为 .sql 格式并重试上传。
phpMyAdmin 允许您导入最大 256 MB 的 数据库,如果超过 256 MB,您可以使用 SSH 导入。
将数据库与您的网站连接
最后一步是确保您的数据库连接详细信息(名称、用户名、密码)与网站配置文件中的详细信息匹配:如何查找 MySQL 数据库详细信息
- 打开 网站配置文件 并更新这些详细信息以匹配新数据库的详细信息。务必更新用户名,因为它肯定不同!
对于 WordPress 网站,它在 public_html → wp-config.php 文件中。连接数据库后,流程完成。
测试网站
- 清除浏览器缓存
- 访问您的网站
- 检查:所有页面正确加载、图片和媒体正常显示、表单和交互功能正常工作、登录功能正常(如适用)
提示:使用 whatsmydns.net 检查 DNS 更改是否已在全球传播。
修复迁移后的常见问题
建立数据库连接时出错
- 仔细检查配置文件中的数据库凭据
- 确保数据库已成功导入
- 验证数据库用户具有适当权限
文件显示不正确
- 检查文件是否位于正确的目录(public_html 或域名文件夹)
- 验证文件权限(文件通常为 644,文件夹为 755)
- 清除浏览器缓存
网站仍显示旧内容
- DNS 更改可能尚未传播——最多等待 48 小时
- 清除浏览器缓存和 Cookie
- 尝试从不同的设备或网络访问
403 错误
如果迁移后访问网站时出现 403 错误,可能是由于 DNS 传播:不同的主机方案有不同的 IP 地址;因此,A 记录已更改并正在传播中;稍作等待,您的网站将正常运行!
缓存
如果迁移后您没有看到正确内容,这可能与浏览器缓存有关:
- 使用隐身模式访问您的网站
- 清除浏览器缓存
- 使用不同的设备/计算机/移动连接代替 Wi-Fi
- 关闭调制解调器/路由器 2 分钟并重新启动
- 清除 DNS 缓存
其他资源
- 如何在 Hostinger 创建备份
- 如何使用 FTP
- 如何使用文件管理器
- 如何创建 MySQL 数据库
来源:Hostinger 官方帮助文档