步骤 1 – 连接
首先,启用 SSH 访问并通过 SSH 连接到你的账户。打开存放待压缩文件和文件夹的目录。具体做法:
- 打开网站根目录。
- 运行
ls命令。若能看到所需文件和文件夹,即可进入步骤 2。 - 若所需内容位于子目录中,运行以下命令进入:
cd path/to/files
其中 path/to/files 替换为文件的实际路径。例如文件位于 public_html/new/version1,则命令为 cd new/version1。
步骤 2 – 创建压缩包
创建压缩包只需 1 条命令。根据要压缩的内容和保存的压缩格式,命令有所不同:
压缩单个文件
- ZIP:
zip archive-name.zip filename1.php filename2.php filename3.php - TAR:
tar -cvf archive.tar filename1.php filename2.php filename3.php - TAR.GZ:
tar -zcf NewArchive.tar.gz filename1.php filename2.php filename3.php
将 archive 替换为你的压缩包名称,其后为要加入压缩包的文件。
压缩整个目录
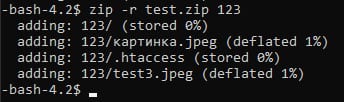
- ZIP:
zip -r archive.zip DirectoryName - TAR:
tar -cvf archive.tar DirectoryName - TAR.GZ:
tar -zcf archive.tar.gz DirectoryName
创建压缩包需要一些时间,直到出现新的一行提示符:
-bash-4.2$
这表示压缩已完成。
来源:Hostinger 官方帮助文档